
Dynamic QR Codes
How it works
Dynamic QR Codes for WooCommerce turns any product — with an optional coupon — into a QR code you can print on a flyer, a price tag, packaging or a shop window. A customer scans it with their phone’s camera and lands in your cart with the product added and the discount already applied. No app, no typing a code, no hunting for the product. And because the code is dynamic, you can still change what it does after it’s printed.
What happens when someone scans
- They point their phone camera at the code — every modern phone reads QR codes natively, so there’s nothing to install.
- The product (or a specific variation) is added to their cart automatically.
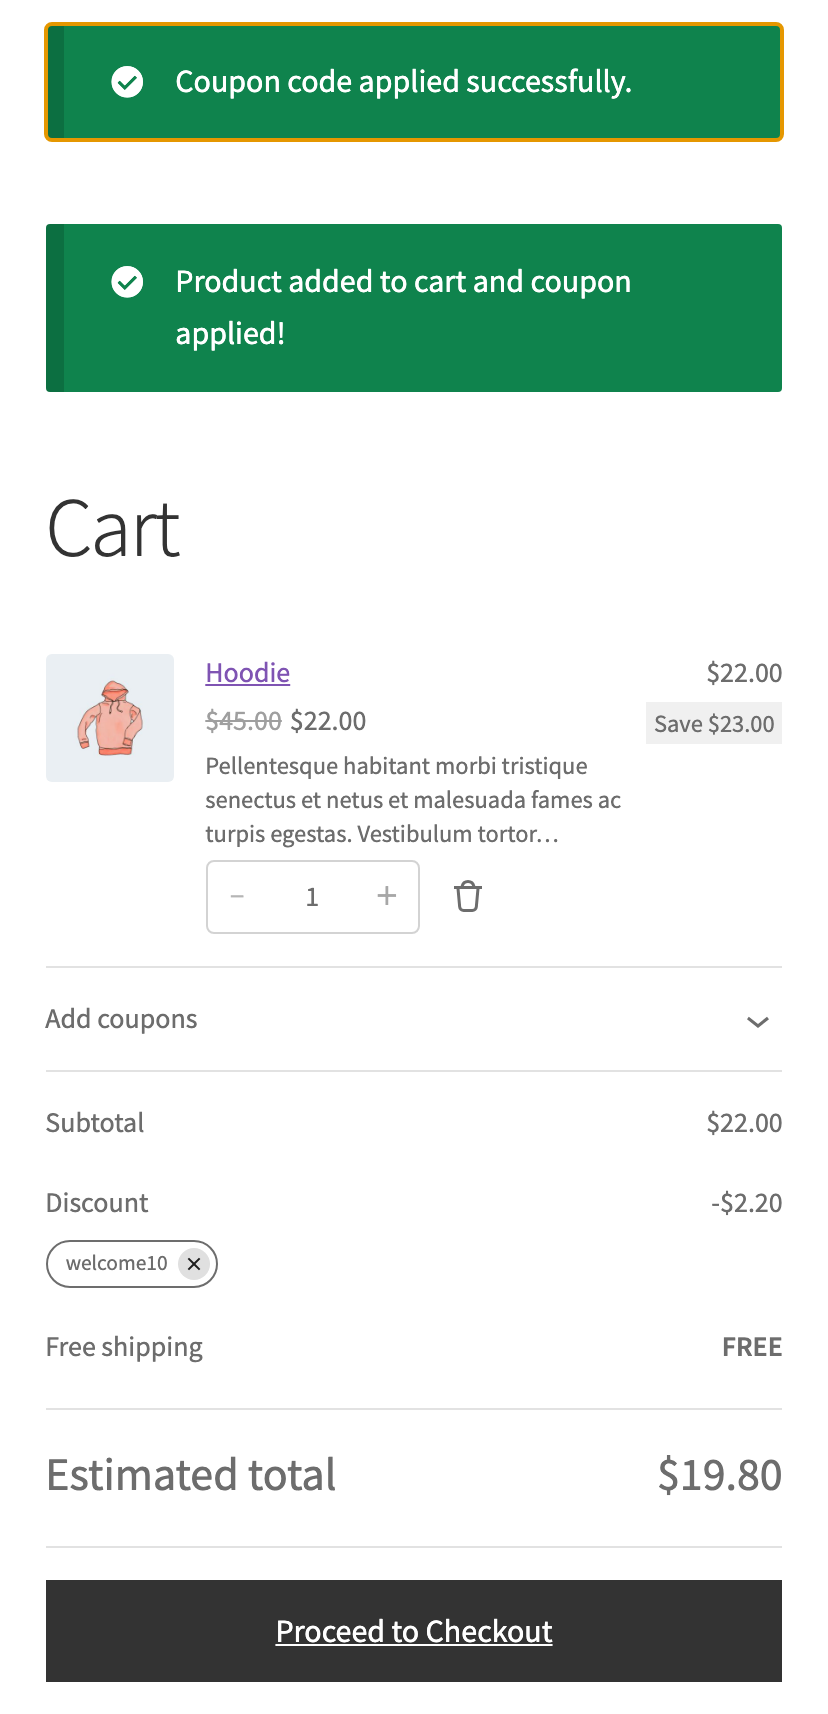
- If the code carries a coupon, it’s applied for them — no code to remember or mistype. They see one message: “Product added to cart and coupon applied!”
- They arrive on the cart, already discounted — one tap from checkout.
Your WooCommerce coupon rules — expiry, usage limits, minimum spend, product restrictions — are checked on every scan, and stock and visibility are re-checked too.
A printed code is not set in stone
A QR code holds only a short address on your store, such as yourstore.com/?qrcw=k7m2xa. What the code does — which product, which coupon — is looked up on every scan. That address never changes, so every copy you’ve already printed follows your edits from the next scan.
- Swap the coupon — promotion over? Edit the code and pick another coupon (or none). No reprint.
- Retire it — a retired code stops adding to the cart and applies no coupon. Scans go to the product page (or the shop, if the product is gone) with the note “This QR code offer has ended.” You can reactivate it any time.
- Restyle it — give an existing code the current site design. New downloads and prints use the new look; the address stays the same.
- Old stickers keep working — codes printed with version 1.x still scan, and your edits apply to them too. A printed code never expires on its own.
With Pro you can change even more after printing — the product or variation, the destination, a fallback page for retired codes, the campaign and the code’s own design. Details on Manage your codes.
Scans, link clicks and visits
Each code counts its Visits: scans of the printed code plus clicks on its copied link. Want to share a code in a message or an email? Use Copy link — those clicks are counted as link clicks, apart from scans, so your printed codes only get credit for real scans. Bots, crawlers and link previews (WhatsApp, Telegram, Facebook and others) aren’t counted and never add to a cart, and unique scans are shown next to the total.
Get started in three steps
On a new store, a Get started panel — “From zero to a scanned QR code in two minutes” — sits at the top of QR Codes → All QR Codes and the plugin’s How it works screen. Its steps tick themselves off as you go:
- Create your first QR code — pick a product and click Open its QR codes box. The box opens with a live preview of your code: click Create QR code. No coupons yet? That’s fine: the code simply adds the product to the cart, and you can add a coupon later.
- Download or print it — a PNG or SVG for flyers and packaging, or add it to the Media Library.
- Scan it with your phone — the panel shows your code large on screen: “Point your phone camera at this”. The step ticks itself off as soon as the scan arrives, and you see exactly what your customers will see.
Only a real phone scan completes step 3 — bots, link previews and copied-link clicks don’t count. The panel is shown to each user until they finish or dismiss it; a store that already has codes and scans never sees it. The full walkthrough is on Create your first code.
What you’ll need
- WordPress 6.1 or newer, WooCommerce 7.0 or newer, and PHP 7.4 or newer.
- At least one product to link a code to.
- A coupon — optional. Any existing WooCommerce coupon works, or skip it for a plain “scan to add to cart” code.
Codes are drawn in your browser, and the plugin makes no calls to outside services. Visitors’ IP addresses are stored only as a hash.
Short links & tracking
Two things under QR Codes → Settings → Links & tracking are worth knowing from day one:
- Short links are opt-in. Once on, new codes point to
yourstore.com/q/k7m2xainstead ofyourstore.com/?qrcw=k7m2xa— fewer dots, easier to scan when printed small. Codes you already made keep their address, and every address keeps working. See Short links. - Tracking tags are on by default. Every scan adds UTM tags (source
qr, mediumprint), so WooCommerce shows a QR order’s origin as Source: qr instead of “Direct”, and Google Analytics sees it too. See Tracking tags.
Where next
- Create your first code — from product to a scanned code, step by step.
- Design your codes — colours, size and the site-wide look; restyle codes you already made.
- Manage your codes — All QR Codes: edit, retire, copy links, visits, who can do what.
- Short links — the opt-in
/q/addresses. - Tracking tags — UTM tags, WooCommerce Order Attribution, Google Analytics and Tag Manager.
- Print your codes Pro — print-ready PDFs and saved print layouts.
- More ways to use codes Pro — link codes, bundles, bulk create, parcel inserts.
- Blank codes Pro — print first, assign later.
- Scan a code Pro — find any printed code with your phone.
- Campaigns Pro — group codes by channel and compare them.
- Track performance Pro — scans, sales and revenue per code.
- Settings — QR design, Links & tracking, Cleanup.
- Troubleshooting — when a scan doesn’t do what you expect.
- Support — how to reach us.
- Developer docs — PHP functions, hooks, REST and WP-CLI.
- Changelog — what changed in each version.
- Playbooks — worked examples for packaging, shelves, flyers and events.
Ready to make one? Create your first code →